One of the most valuable aspects of a visit to the Kokufu exhibit is the opportunity to study great trees in person. Just looking at a handful of pines, for example, can reveal very different approaches to creating branch structures and silhouettes.
Let’s start by looking at four medium-size trees.
The first tree has very flat, or horizontal, branch pads. Although the apex is rounded at the top, the tree has relatively straight sides giving it a triangular silhouette. The internodes are very short – the result of annual plucking and decandling for many years.
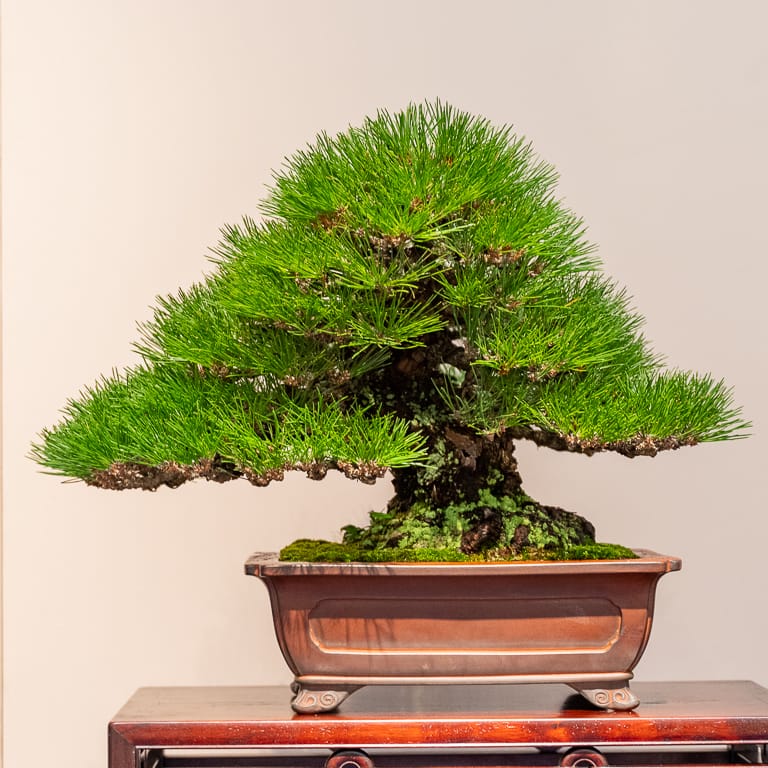
Pine #1
Compare this with the tree below. The silhouette here is much rounder, and the branch pads slope downward giving us a better idea about the shape of each pad. Perfectly even needle density from top to bottom reveals great technical expertise.
One of the biggest structural differences between these two trees is that there is more space between the lower branches on the tree below. These spaces, coupled with slightly longer internodes, let us see into the middle of the tree where can get a good look at the trunk.
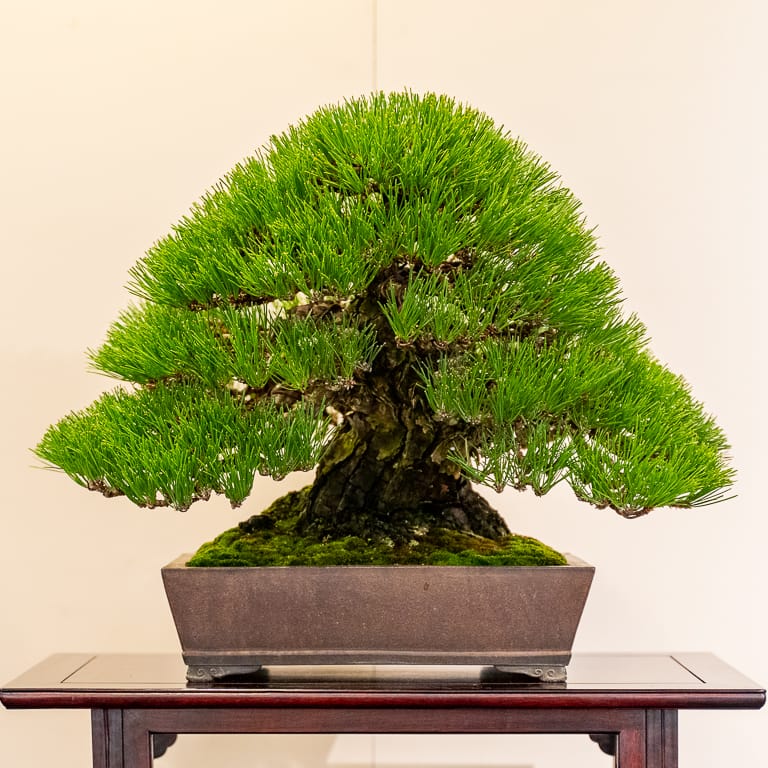
Pine #2
The approach is similar on the pine below. Because the trunk has more movement, there is more opportunity for gaps between the branches which contribute to a more dynamic design.
The feeling of movement is exaggerated as the tree leans left (as indicated by the flow of the lower section of the trunk and the large first branch on the left side) but the apex points the the right (the right side of the silhouette is steeper or shorter than the left side).
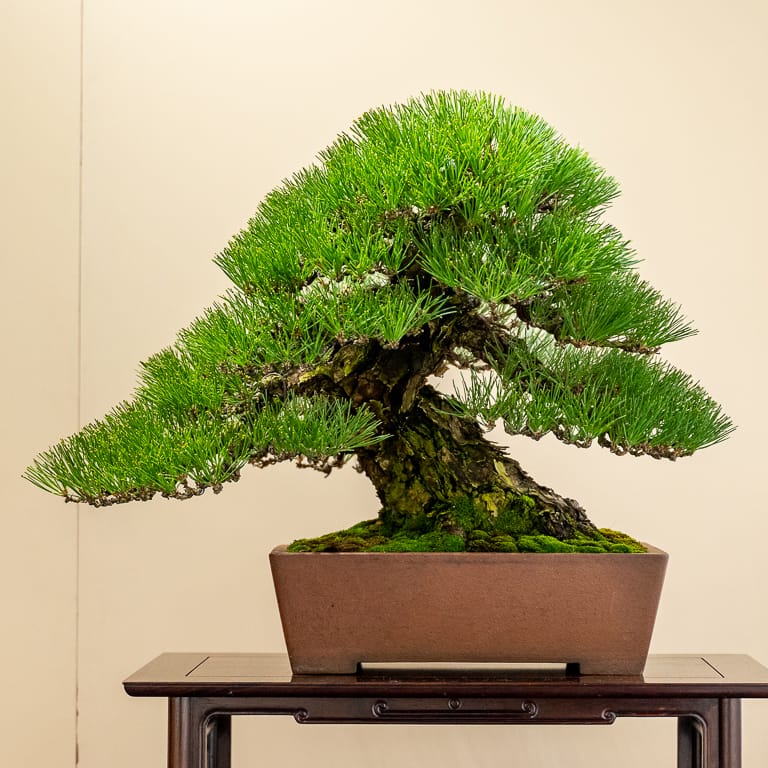
Pine #3
In contrast to the above pines, the pine below takes a different approach. Most importantly, the lower branches block our view of the lower section of the trunk.
Although most of the branch angles are consistent, the lowest branch on the right slopes downward and the branch and needle density differs slightly from branch to branch. These subtle differences call attention to the branches instead of the trunk. Shorter needles make it easier to see between the branches and make the tree look bigger, but they also reveal inconsistencies in branch density and spacing.
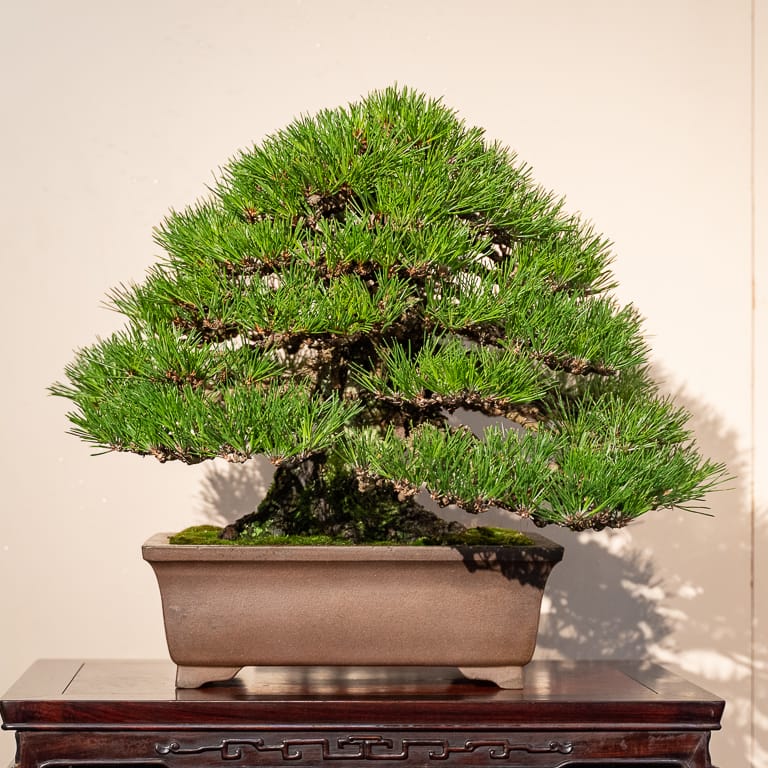
Pine #4
The next two trees are cascades with dense canopies. What surprised me about both was how little space there was between branches. The overall impression was lots of lush green foliage, but I had to move around to see how the branches were set up or to appreciate the age and character of the trunk.
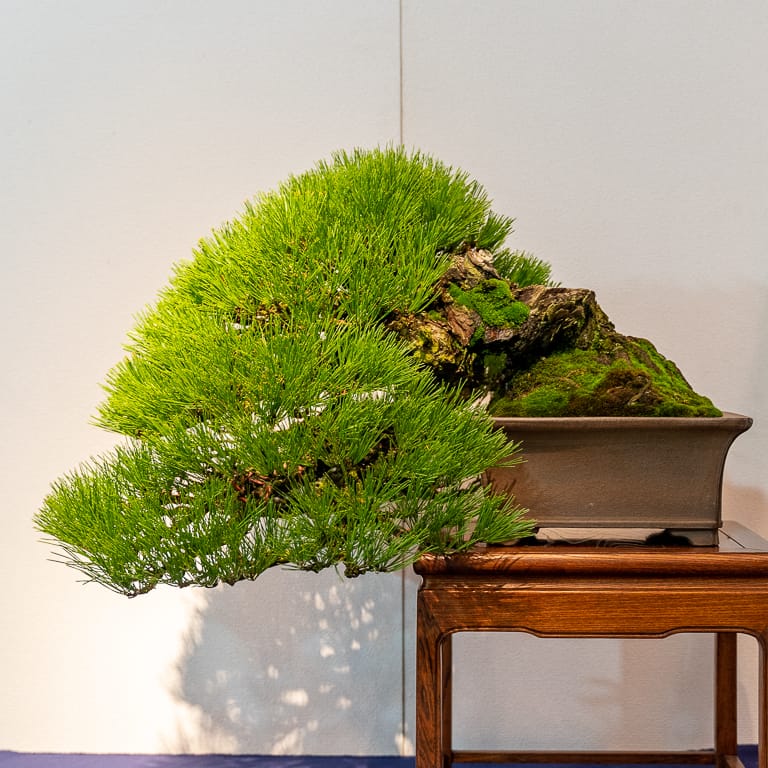
Pine #5
This seemed like a missed opportunity to show off more of the trunk. The tree below reveals more structure than the pine above, but the needle density isn’t as consistent (the lowest branch is thinner than the upper branches).
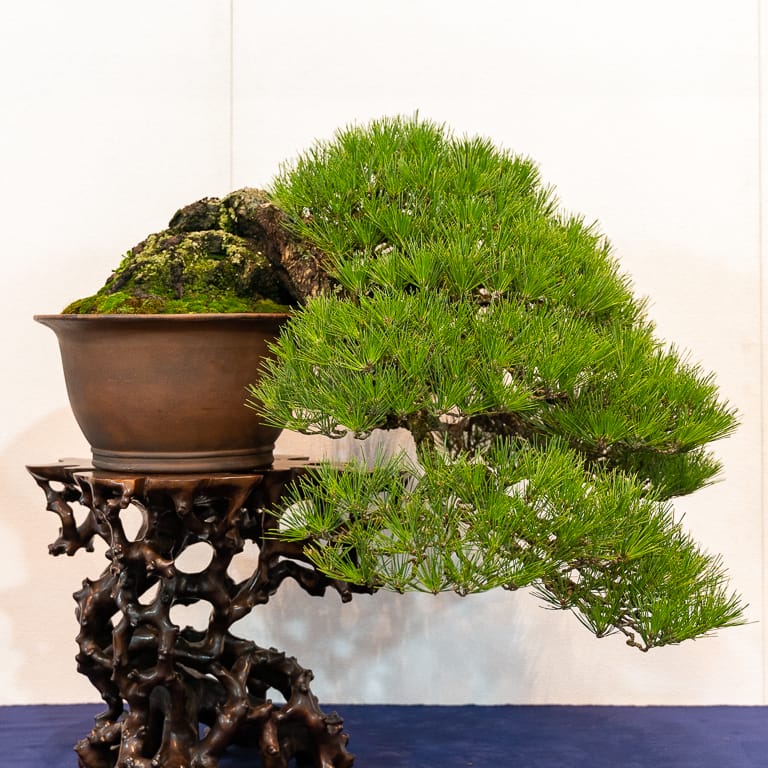
Pine #6
The next four pines are large-size bonsai. The branches on the specimen below are a good example of how the gaps between branches are often larger near the base of the trunk and smaller near the apex.
The tree has relatively short needles for such a large pine which make it look even bigger.
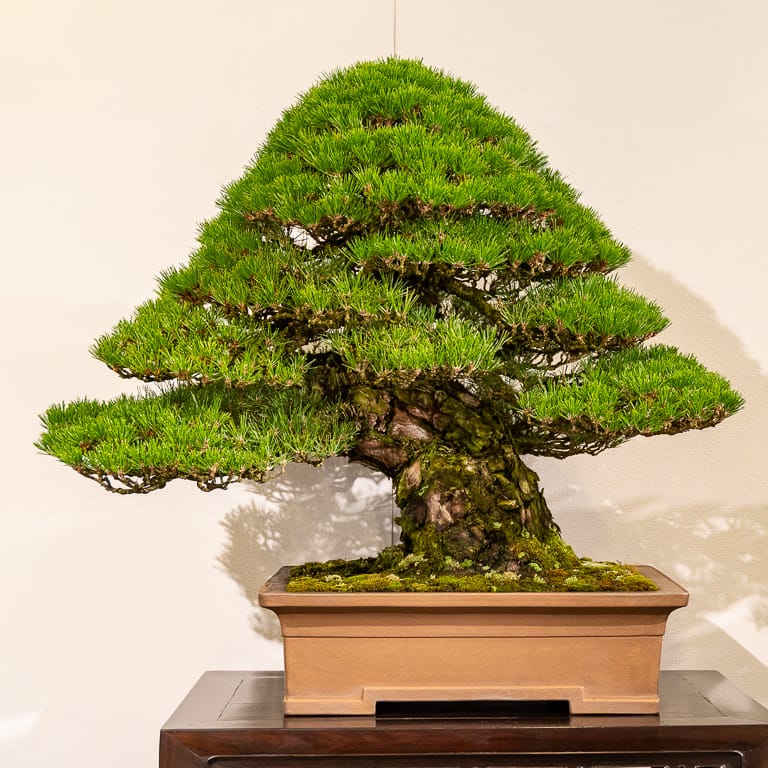
Pine #7
The next pine was one of my favorites in the exhibit. Although it’s impossible to see from the image, the trunk movement was fascinating. After rising and moving up and towards the right, the trunk turns downward and doubles back toward the center before rising to form the apex.
There are few gaps between the branches which makes for a full canopy that’s more interesting in its shape than its composition. Although the apex and the lowest section of the trunk points to the left, the accent was displayed on the right side.
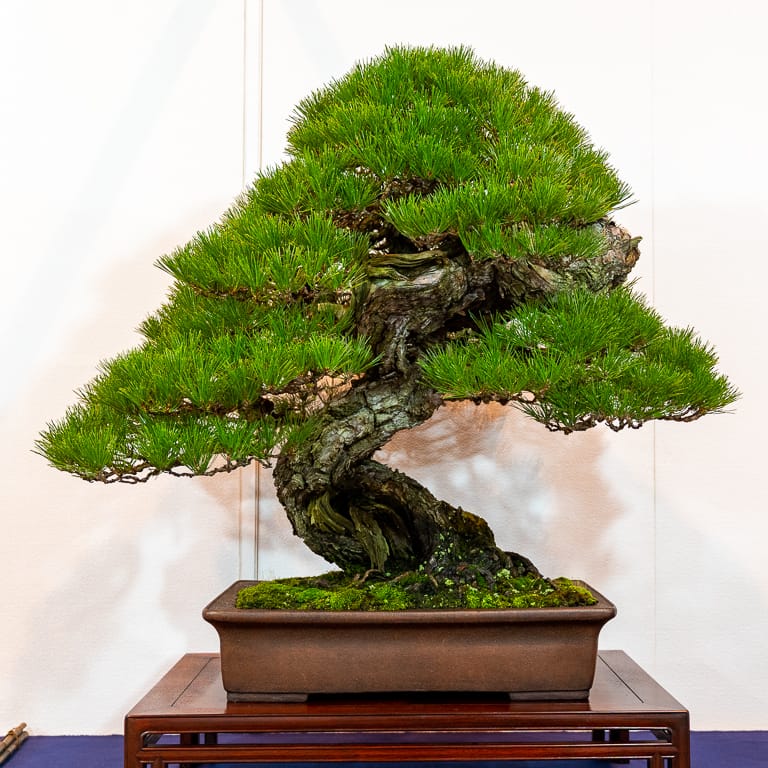
Pine #8
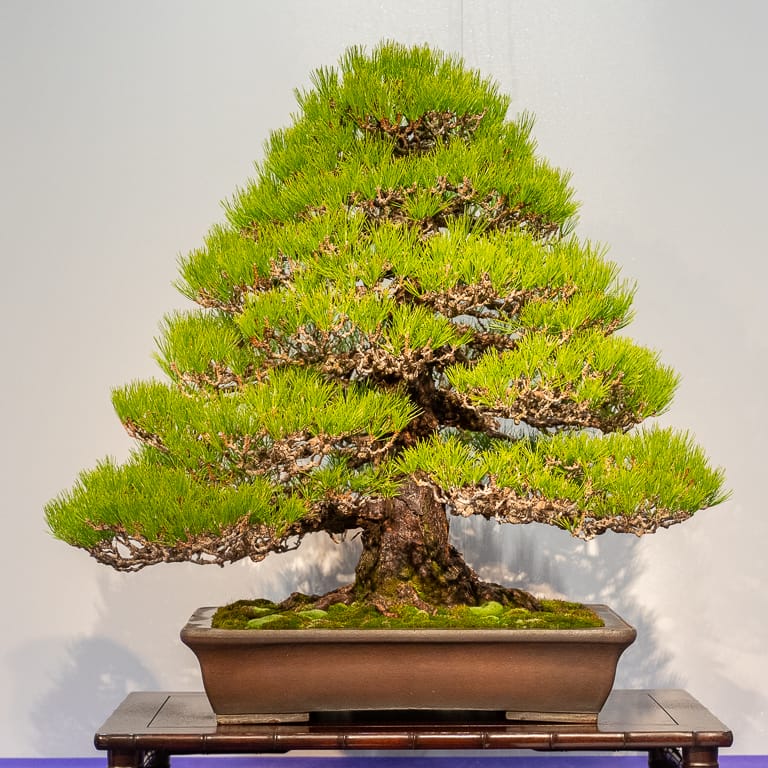
There are few well-designed formal upright pines anywhere and the tree below is one of them. The branches emerge from all points around the trunk and the gaps between branches gets smaller from the bottom to the top.
The slightly disheveled look owes to the lack of wire on the branches. For the tree to look this good without wire reveals many years of training.
Pine #9
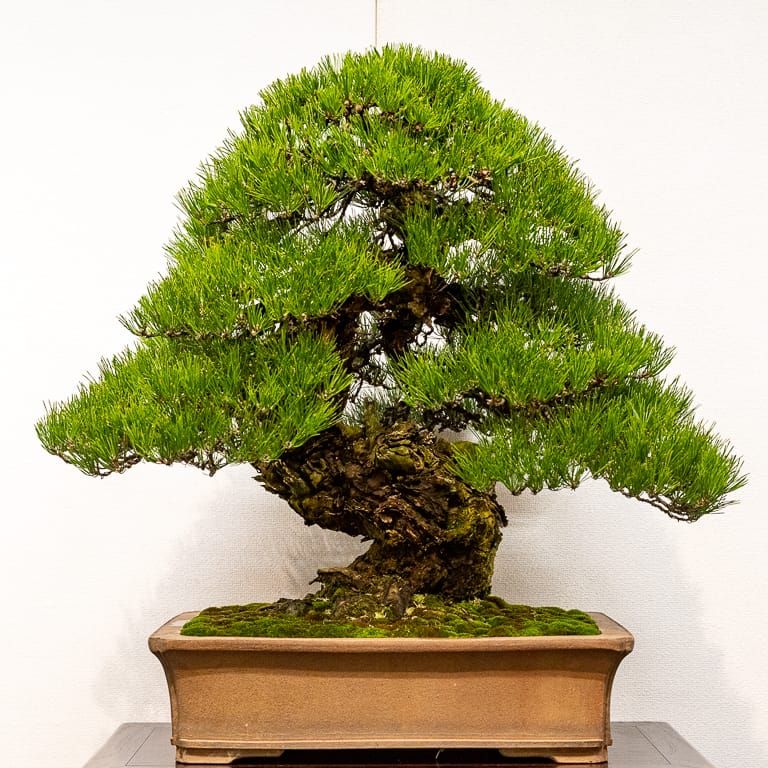
The final pine we’ll look at today does a great job of presenting its age. We have a good view of the large trunk on which scars and deep plates of bark are present. The branches all droop downward and the apex is soft and round. There are no hard lines anywhere in the design.
Pine #10
The above notes are just a starting point for pine study. The next step is to determine which characteristics most appeal to you. Short needles or long? Straight sides or rounded silhouettes? Large gaps between branches or no gaps?
Armed with a goal for each of your trees, you can begin investigating the techniques required to yield these very different but equally beautiful effects.
Extra credit: review the pots for each of the pines above to identify your favorites. Do you prefer straight lines, or slightly curved lines? Lighter colors or darker? Detailed pot feet or simple feet? You get the idea.
Next up: Kokufu 101: deciduous bonsai
Online Consultations Now Available!
Have questions about your trees? Schedule an online appointment to discuss strategies for improving your bonsai. Learn more about Bonsai Tonight’s Video Consulting.
Subscribe to Bonsai Tonight
New Posts Delivered Every Tuesday and Friday
Jst Osebno says
Trees in person?!? Well then…
Edward Stanton says
Today’s blog is an example of why we look forward to Tuesdays and Fridays. Thank you again, Jonas.
Jonas Dupuich says
Thanks, Ed!
Dawn says
I agree with Edward. Such a super learning experience. Thanks Jonas!
Jonas Dupuich says
Thank you Dawn!
Lani says
Jonas,
What a nice selection of trees for a study. Thank you for taking the time to bring out the particular nuances that separate each of these trees from each other. Now my question: in developing pine #5&6, how would a person create such a wide, tapering base? Would this be considered an exposed root? I wonder what a much younger semi cascade JBP in development would look like? I think this is my favorite JBP style.
Jonas Dupuich says
Thanks Lani, great question. I don’t know how these trees were developed, but I’d guess they were field-grown or collected from a garden and trained as bonsai for a long time. Along the way, the angle was likely adjusted downward which appears to have exposed a bit of root near the base of the trunk. It’s hard to tell from the photos, but I suspect we’re looking at either roots which circle near the base of the trunk to make it look huge or circled to cause swelling a long time ago (#6) or roots that are mounded up before the trunk heads out to the side (#5).
Will have to check on the history of large semi-cascades when I next get the chance!
Lani says
Thank you!
Graham Hutchinson says
Hi Jonas
Really enjoying your blog just need to adjust timing to suit Australia
My question is are you able to provide some approx sizes of the pines in this blog for comparison to my Pines
Jonas Dupuich says
Hi Graham – good question. I’d guess that trees 1-4 are up to 18″ tall, trees 5-6 are 24″ and 30″ respectively, and trees 7-10 are roughly 26″-36″ tall.
Graham Hutchinson says
Thanks Jonas
Your reply gives me a good idea of the proportions between the height of the tree and the trunk diameter, and you reply to the post from Lani confirms there is no other way of trunk development than growing them in the ground or is there any techniques that you know of that provide a faster trunk development
Jonas Dupuich says
The basic recipe for thickening is to let the tree grow rapidly, whether in the ground or in a container. The more sacrifice branches grow, the thicker the trunk will become.
Here’s a primer on sacrifice branches: https://bonsaitonight.com/2018/03/30/bonsai-development-series-6-sacrifice-branch-basics/
Lani says
I’m wondering if the cascade were grown bent down for a really long time as Jonas suggests, that over time the roots would have to fortify themselves more than an upright style. They might have to bulk up more at the base, and do so for a long time. Field growing would be difficult to manage unless you are growing it over a cliff. But heck, maybe that’s how the growers are doing it.
Jonas Dupuich says
Good point Lani – it could be that cascading trees develop differently to maintain their balance. Another way to make cascades is to radically change the angle of field-grown trees with a big bend near the base. I’ve done this with both pine and juniper. Yet another option would be to incrementally add bends to the trunk over the years until a satisfying cascade form is achieved.
Here’s a look at the field-growing operations I’ve seen. No signs of any cascades!
https://bonsaitonight.com/2012/12/21/kinashi-bonsai-district/
Graham Hutchinson says
Thanks Jonas
The sacrifice branch basics will be very helpful I shall use the archives more from now on
Cheers Graham