In preparation for repotting season, Boon brought several pots to January’s Bay Island Bonsai meeting that exemplified the proper way to prepare pots for repotting. The technique differ slightly for pots with one, two, three or four drainage holes. First cover drainage holes with screen to keep soil in and insects out. The examples below feature “Z” clips – “C” clips may be used for small drainage holes (see “Repotting a Trident Maple” for an explanation of the “Z” clip). Tie-down wires are then measured and fitted into place. For round pots, measure out a length equal to the circumference of the pot. For rectangular pots, measure out a length equal to two long sides of the pot and one short side (two lengths and a width). You can make adjustments based on the placement of the drainage holes and the depth of the pot – for example, use longer lengths for deeper pots. For pots with a single drainage hole, secure tie-down wires to a “little-man” clip (the clip resembles an armless stick-figure).
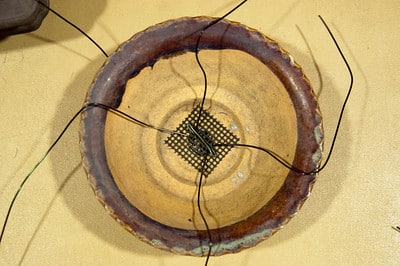

One-hole pot from above

One-hole pot from below
For pots with two drainage holes, situate the wires at the inside edge of each hole. This lets us use as little wire as possible and prevents the screen from moving when we tighten the wire.
Two-hole pot from above
Two-hole pot from below
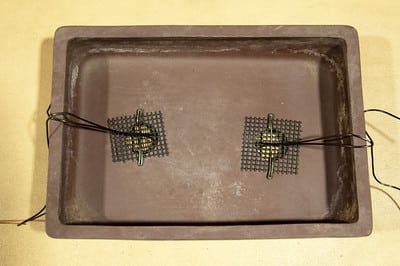
The preparation for three-hole pots is similar to the process for two-hole pots. The difference: one hole gets two wires, the remaining holes get one wire each.

Three-hole pot from above

Three-hole pot from below
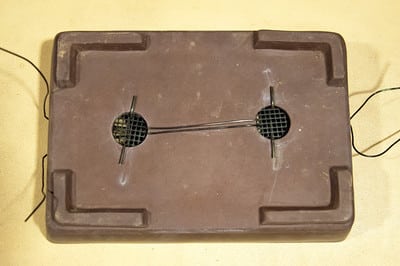
For rectangular pots with holes in the corners, place each tie-down wire so it connects two holes along the width of the pot. Connecting holes along the long side of the pot wastes wire. Placing the wire through the holes at the points closest to the center of the pot will prevent the screen from moving when the wire is tightened.

Four- or five-hole pot from above

Four- or five-hole pot from below
For small accent plants, use thin wire and forgo the “little-man” clip.

One-hole pot for accent plants from above

One-hole pot for accent plants from below
If it’s hard to see the wires against the screen, click the photos to get a better look.
Subscribe to Bonsai Tonight
New Posts Delivered Every Tuesday and Friday
El Tim says
Do you have a blog really interesting and well documented, a great job.
Greetings from Spain.
http://eltimbonsai.blogspot.com/
Chris L. says
great blog for bonsai enthusiats..
thanks for your awesome documentations!
best regards from austria
jeremiah lee says
This is a very useful and helpful post! It’s hard for me to remember all these.
Scott Roxburgh says
I agree with Jeremiah,every time I repot, I quickly watch Boon’s DVD to make sure it secures the tree tightly.
Now, I have another quick refernece point, thanks Jonas for another great post!