Part 3 of 5
I’ve seen it first-hand. Visiting bonsai teachers come to town and whip trees into spectacular shape only to leave the trees’ owners with ticking time-bombs. Until a tree is in outstanding health, it’s a poor candidate for even the most basic bonsai tasks. Great bonsai work requires great health, and great health begins with the roots. If you hear otherwise, think twice before handing over the scissors.
All of this to say that repotting is serious business. Cutting too many roots can weaken or kill a tree – not cutting enough can lead to root rot or dieback and prevent good nebari from developing. When done well, however, repotting can invigorate bonsai and give them the strength to recover from the most intensive styling techniques. That’s why repotting has always been among my favorite tasks. It’s an art unto itself, and it’s never failed to keep me interested.
Trident maple is best repotted in late winter or early spring. And while most deciduous trees are typically repotted before they leaf out, tridents can be repotted as long as the leaves are ruddy. Repotting this late can slow a tree down a bit, but if it’s in otherwise good health, it won’t skip a beat.
Root-work begins, in this case, with the bottom of the rootball. To get to the bottom I have to tip the tree onto its side. After removing the tree from the pot I can see that the roots are loose where the sickle passed, but nice and compact on the other side. If I tip the rootball onto the side where the sickle passed, I can damage loose roots. Tipping the tree onto the untouched side can protect the rootball while I work on the base. This explains why I begin with the bottom of the rootball. If I start with the top or the sides, I’ll be exposing roots that could get damaged when I turn the tree onto its side.

Rootball – where the sickle passed
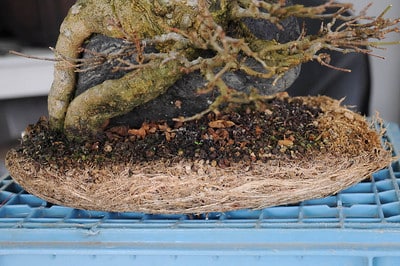
Rootball – the untouched side
I’m fairly picky about the tools I use when I repot. I’ve found that the rake below is perfect for combing out the roots on the bottom of the rootball. I work from the center and drag the rake outward keeping it parallel with the base of the tree.
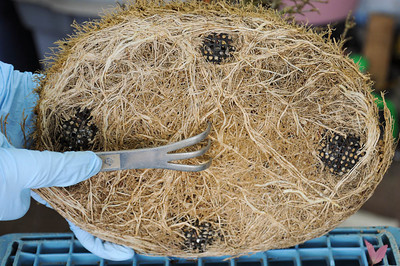
Raking the base of the rootball (one year’s growth)
I try to keep the base as flat as possible when I work to avoid causing air pockets when I set the tree in the pot. Holding the rake at an angle or working for too long in a single area can quickly create pockets, and in some cases, can weaken the entire rootball.
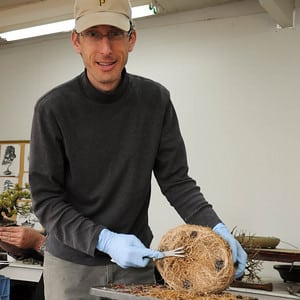
Working on small trees planted in good soil is fun work. It’s those two to three hour jobs that can try one’s patience – and forearms
After combing them out, I cut the hanging roots until the base is even. By leaving a little root sticking out from the rootball, I can help the roots integrate into the new soil. Cutting them flush can make it hard for the roots to penetrate new soil.
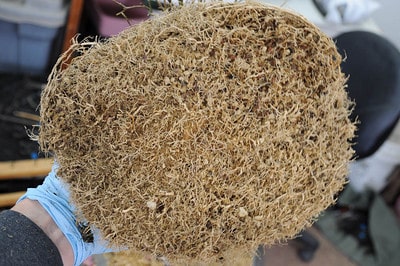
Root-work completed on the bottom of the rootball
Once the base is done, I can set the tree down and work on the top and sides of the roots. Bent-nose tweezers are great for this. I’m careful, however, not to hold the tweezers too high when I work. Steep angles can snag roots, causing them to snap or tear. By holding them at a lower angle, I can help the tips of the tweezers glide over roots without damaging them.
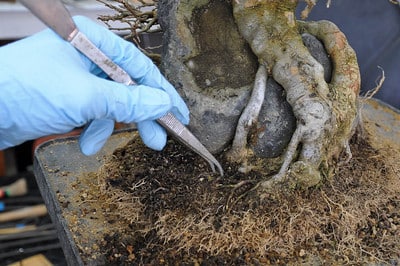
Improper tweezer technique (angle too high)
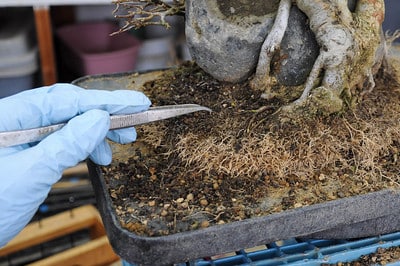
Better tweezer technique (appropriate angle)
You may have noticed that the soil is darkest near the surface of the roots. That’s evidence of the organic fertilizer I use – cottonseed meal, in this case. To improve the drainage, I scrape away as much of it as possible. When I’m done, I cut the roots evenly as I did on the base.
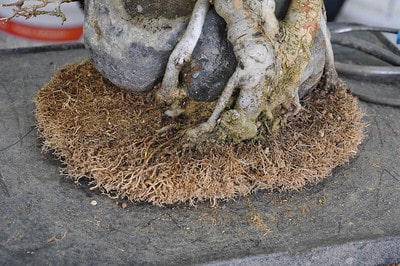
Root-work completed
It takes practice to learn how much to cut. When I don’t have a teacher around to guide me, I tend to work with caution and pay close attention to how the tree comes out in spring. Over the years I’ve gotten much better at getting the results I’m shooting for, but I still find I have to pay close attention while I work.
Next up: Part 4 – Securing the tree in the pot.
Subscribe to Bonsai Tonight
New Posts Delivered Every Tuesday and Friday
tom tynan says
This is a great five-part series; a few comments about the way you work…are you periodically spraying the roots during this process, of course a function of how long you work on the roots and the temperature [quite mild I would assume]. Also….the root rake you are using has 3-tines; what is your experience with a single tine root rake – any thoughts on which is easier, less likely to damage roots….
thanks again…Tom
xwires says
Thanks Tom. John covered rake use well. There are big and little rakes, but both generally do one of two things, without regard to size. Multi-tine rakes are great for removing soil from a rootball while single-tine rakes and tweezers are best for removing soil from roots you’re going to keep. We typically leave good roots near the surface to develop the nebari and remove the roots that grew at the bottom of the pot.
It’s rare that I spray roots as they don’t tend to dry out while I work. Temperature and humidity are a big part of this, and the roots are usually moist – but not wet – to begin with. If I leave a tree alone for a while mid-repotting I drape a moist towel over the rootball. When, however, I notice that the roots are dry, especially when I’m working with bare-root or collected material, I spray as necessary.
John Kirby says
Tom,
When you work with Boon you learn to use the 3 tine tool on the bottom and tweezers or a single tine tool on the top and sides. This is what Boon teaches and when you are at Boon’s this is what you do, I have taken this process home and use it on my trees. It works.
John