Now that decandling season is coming to a close, I thought I’d share an overview of the process taken from previous posts. Let’s begin with the obvious question:
What is Decandling?
There is a lot to say about decandling pine bonsai. There are as many approaches to decandling as there are bonsai professionals, and many of these approaches have merit. As we wrap up this year’s decandling season, I’d like make a few comments on the topic in as straightforward a fashion as possible.
My starting point for this information is many years’ study with Boon Manakitivipart and conversations with Japanese bonsai professionals including Daisaku Nomoto, Akio Kondo and Junichiro Tanaka. Connecting the various approaches used by this group are a few common threads, and it is with these threads that I’ll begin.
A Definition
Decandling refers to a set of cultivation techniques that focus on the removal of spring growth from red or black pines to stimulate a second flush of growth in summer.
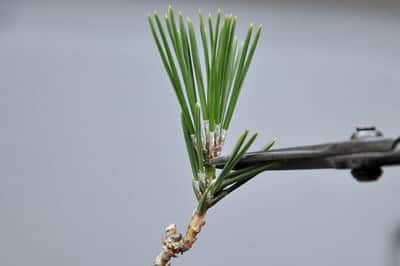
Removing a spring shoot from a Japanese black pine – the primary act of decandling
The term typically refers to more than the simple act of removing spring candles as the timing of the practice and various techniques relating to after care have a large effect on the results of the practice.
What Decandling isn’t
The following techniques are similar to decandling in that they focus on improving the balance and vigor of pine bonsai, but fall outside of the practices commonly referred to by the term “decandling.”
- Cutting, breaking or removing spring growth before the spring needles emerge. One technique for balancing vigor in pine bonsai involves the reduction of spring candles as they are elongating. These techniques produce very different results from decandling and will be considered separately.
- Removing part, but not all, of a spring shoot. Decandling involves the complete removal of given spring shoots. Reducing spring growth by half or some other percentage can be used to address vigor in pine bonsai, but produces different results from decandling.
A Note on the Term “Decandling”
As spring growth develops on red and black pines, the emerging shoots can be said to resemble candles. As used here, however, the term decandling refers to the removal of spring shoots after the new needles have emerged. I don’t know how the term “decandling” came to be associated with the removal of growth after the shoot ceases to resemble candles, but I’m loath to introduce another term as the community in which I participate uses the term decandling consistently and successfully.
The Japanese phrase for decandling is me-kiri: “bud-” or “shoot-cutting” (芽切り, if you were curious).
Why We Decandle
Sometimes the reasons why we decandle pine bonsai can get lost in the discussion of how we decandle. In short, decandling is the single-most important technique used to develop beautiful black and red pine bonsai.
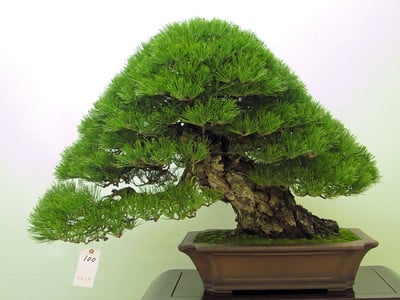
Black pine exhibited at the 2011 Taikan-ten
Why Decandle Red and Black Pine Bonsai?
- To stimulate back budding. The stress caused by removing spring growth can activate dormant or adventitious buds on woody growth. Back buds – buds that develop not at the ends of branches but from within the tree’s interior – allow us to maintain the size and shape of our trees. Without them, bonsai would grow larger and larger each year.
- To increase branch density. Decandling adds density by replacing single spring shoots with multiple summer shoots. Decandling further increases density by stimulating adventitious buds at the base of spring candles – barren areas that don’t typically produce buds. And as summer shoots are usually smaller than spring shoots, internodes are further reduced yielding more refined ramification.
- To regulate vigor. Decandling is a useful technique for keeping new growth on pine bonsai in check.
- To promote balance. Various decandling techniques can be used to decrease vigor in strong areas and increase vigor in weak areas to improve overall balance.
- To reduce needle size. Red and black pine bonsai are at their most beautiful when the needle size is a good fit for the tree. Decandling can let us produce short needles on small trees and larger needles on larger trees.
Selecting Trees for Decandling
While decandling is a great technique for refining red and black pine bonsai, knowing when to decandle is just as important as knowing when not to decandle.
When is Decandling not Appropriate for Red and Black Pine Bonsai?
- When the goal of training is to increase the size of the trunk. Let these trees grow until the trunk reaches the desired size before decandling.
- When a tree is unhealthy. Decandling is stressful for pines – only decandle trees that are healthy, vigorous and insect-free.
- When a tree is weak or under-fed. If otherwise healthy pine bonsai have not received adequate fertilizer in spring or have been weakened from stresses like repotting or inclement weather, take a break this year and decandle the following year when the tree is stronger.
Feel free to decandle when your red or black pine bonsai are in refinement phase, are healthy, well-fed, and growing in soil with good drainage. Following are some examples of when to decandle and when to hold off.
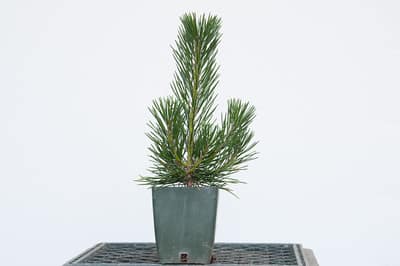
The trunk needs to develop – do not decandle (3 years old)
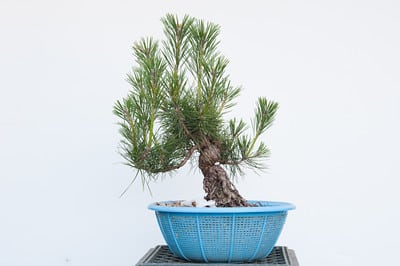
The trunk has reached the desired size – start decandling (9 years old)
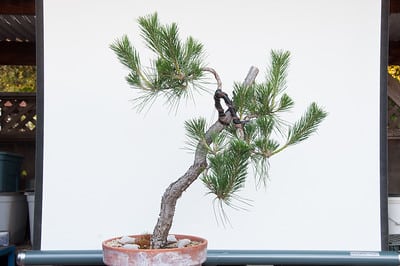
The tree is entering refinement phase – decandle (15-20 years old)
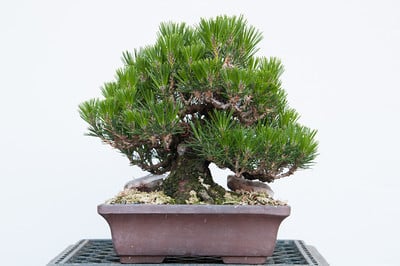
A tree in refinement phase – decandle (19 years old)
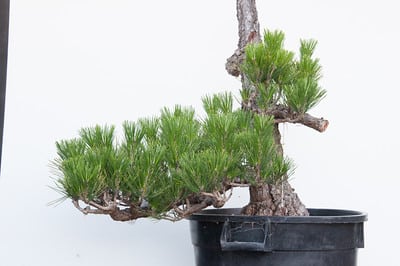
This tree is entering refinement phase – decandle (20-25 years old)
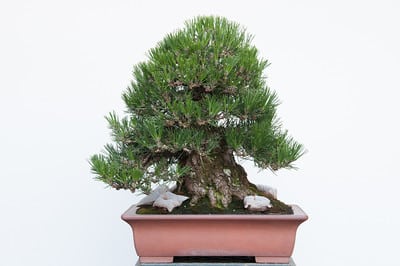
This pine is less vigorous than normal after repotting – do not decandle (35-40 years old)
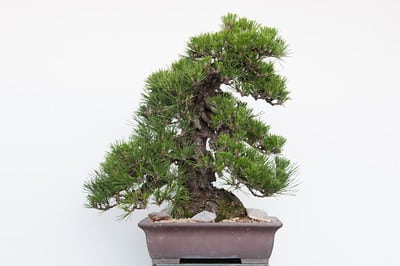
The cork bark black pine is less vigorous than normal after repotting – do not decandle (40-50+ years old)
Preparing Trees for Decandling
Preparing red or black pine bonsai for decandling is straightforward – keep trees healthy, give them lots of sunlight, and feed heavily. If the tree is growing in poor soil, repot it in soil that drains well and decandle when the tree begins to grow vigorously.
How Much Should I Feed Black Pine Bonsai I Plan to Decandle?
A lot. Start applying fertilizer as soon as the roots become active. In warmer areas, this may be as early as February – in areas with longer winters this may be as late as March or April.
If using dango or similar dry fertilizer, begin by placing a few balls on the surface of the soil and add more each week until the surface of the soil is nearly covered with fertilizer. If using liquid fertilizer, apply it consistently throughout spring. Combinations of dry and liquid fertilizer are also acceptable.
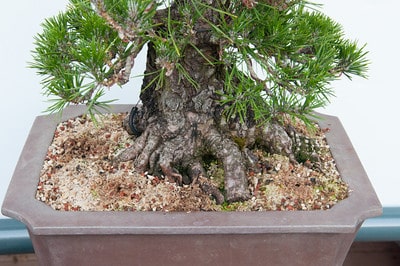
Black pine – week 0
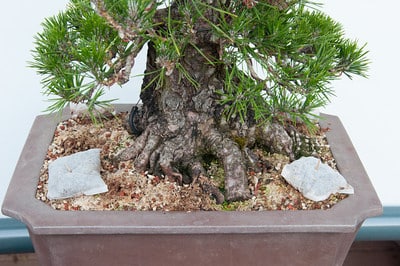
Week 1
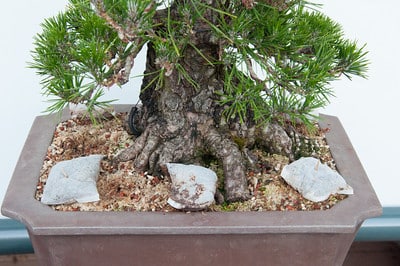
Week 2
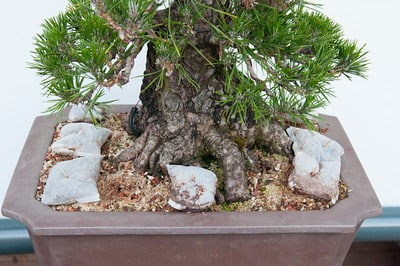
Week 3
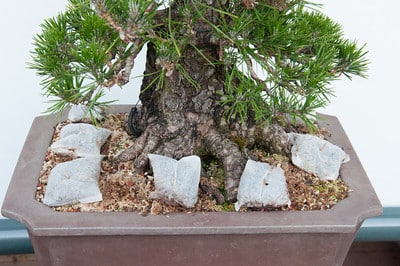
Week 4
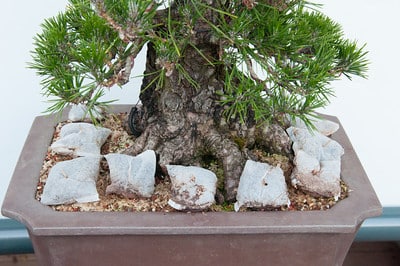
Week 5
When to Decandle
Depending on our approach, we can decandle all of a tree’s new shoots on a single day or spread out the process over a few weeks (more on that later). This period of time is defined primarily by climate.
Climate
In general, decandle earlier in northern latitudes or cooler climates and later in lower latitudes or places with warmer climates. The following provides a rough guide to when we can start decandling in different parts of the US:
- Cool climates (Seattle, Pacifica) – late May
- Moderate climates (San Francisco Bay Area) – early June
- Warm climates (Los Angeles, much of the Midwest) – mid to late June
- Hot climates (much of the South) – early to mid July
If you’re not sure where to start, seek help from an experienced bonsai enthusiast in your area and, if possible, ask to see their trees to get a sense of how pines respond to decandling in your area.
Tree Size
The decision of when to decandle also depends on the size of the tree. The more time summer shoots have to develop, the longer new needles will become. Put another way, if we decandle on the early side, new shoots will have a longer time to develop than shoots decandled a few weeks later. Let’s pause there for a moment….
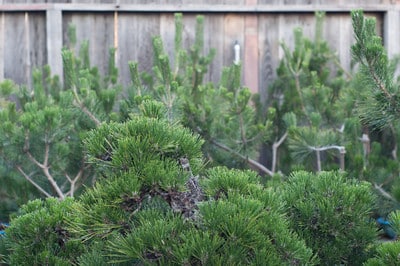
Black pine foliage
In general, we try to encourage large needles on large trees and small needles on small trees. Very small needles on a large pine would look out of place – more like a white pine, in effect – and might make us wonder about the health of the tree. Large needles on a small tree look unruly and obscure branch pad definition. Developing needles in proportion to the overall size of the tree tends to produce pleasing results.
By decandling large trees early in the decandling season, we give summer shoots adequate time to develop appropriately long needles. By decandling small trees later in the decandling season, we give summer shoots less time to develop, thereby producing shorter needles. Let’s pause again for a moment….
Still with me?
If so, great – you’ve just internalized one of the most important aspects of decandling. It may seem picky to make distinctions as small as a few weeks here or there, but pines respond well to these subtle adjustments, and it is with these subtleties that some of the most beautiful pine bonsai have been created, and by which some of the best pines of the future will be created.
Making the Cut
After many years of decandling red and black pine bonsai, I find I still need to pay close attention as I work. It’s easy to cut too high or too low, cut at an angle, or accidentally cut nearby needles. If you can avoid these cutting mistakes, you’re off to a great start.
There are only a few things to keep in mind when making the cuts to remove spring growth, but each is important.
- Make the cut square – angled cuts can yield uneven summer growth
- Leave some new tissue – adventitious buds sprout from new tissue; cutting into last year’s growth will reduce vigor and stimulate needle buds
- Don’t cut surrounding needles – it’s easy to accidentally cut surrounding needles; make cuts with care
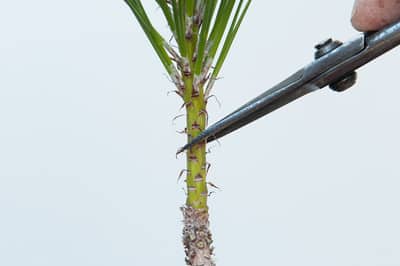
Bad angle
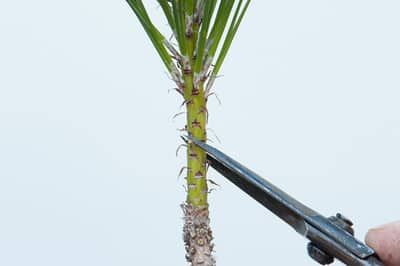
Bad angle
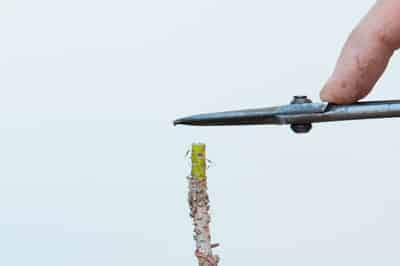
Good angle
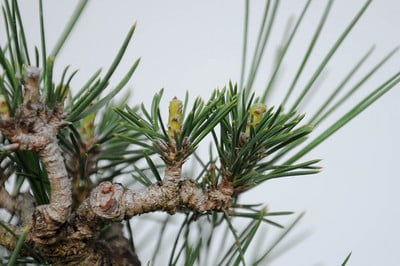
Plenty of new tissue
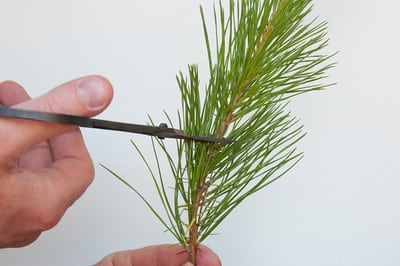
Careful not to cut surrounding needles
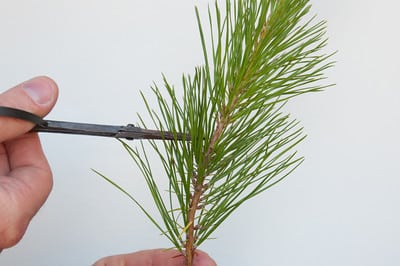
Approach shoot with scissors closed
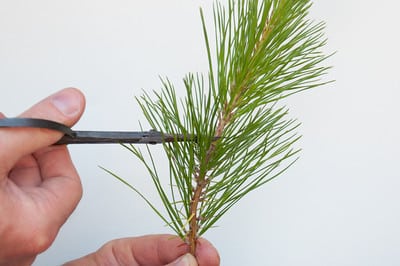
Open scissors when you get to the shoot
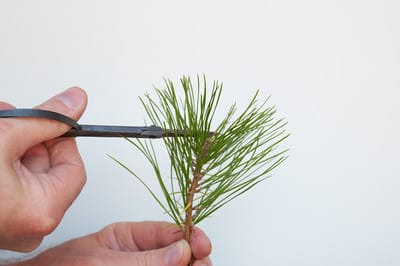
Cut with care
I’ll say more about how much new tissue to leave below.
Techniques for Controlling Vigor
So far we have covered techniques for controlling the vigor of summer shoots for an entire bonsai. Now we’ll look at three techniques for controlling vigor shoot by shoot. One of the greatest benefits of decandling is the ability to weaken strong branches and improve the vigor of weak branches. It is through the successful application of these techniques that well-balanced pines are developed.
How Do I Control the Vigor of Individual Branches?
There are three main techniques for controlling the vigor of individual branches:
- Pulling needles
- Leaving stubs
- Decandling different branches at different times
Having decided to decandle a given branch, we first remove the spring shoots.
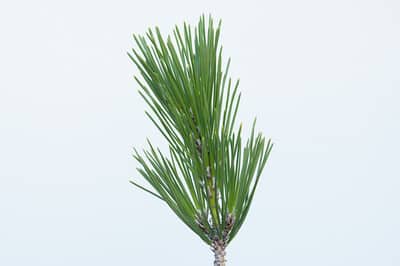
Spring shoots
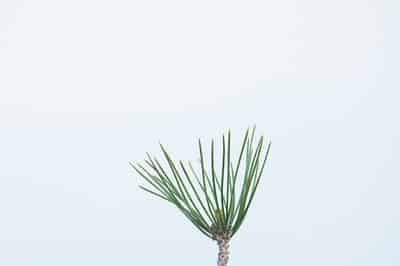
Spring shoots removed
To further reduce the vigor of this branch, we can take the first approach noted above and remove some of last year’s needles.
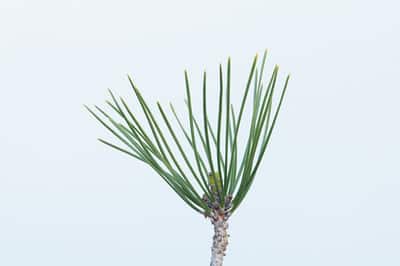
Before pulling needles
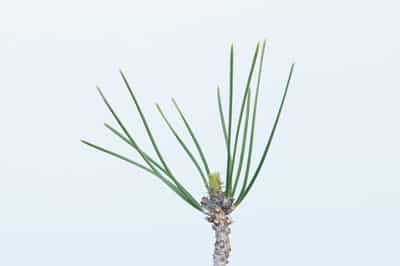
After pulling needles
How many needles we can pull or leave depends on how many needles we started with, the relative vigor of the branch, and the general approach to decandling. The range is often between three and twelve pairs per branch. I’ll say more about needle pulling below.
The second approach to reducing vigor involves leaving a stub at the base of the candle. Leaving a stub preserves tissue that produces auxins, the hormones that apical buds use to slow down the development of adventitious and lateral buds. The longer the stub, the more auxins, and the slower the adventitious buds are to develop. Simply put, long stubs slow down the development of summer shoots.
Using Stubs to Control Vigor
A common approach to leaving stubs is to leave long stubs on strong shoots, small stubs on weak shoots, and medium-sized stubs on medium-vigor shoots.
- Strong shoots – stub length is about 2x diameter of shoot, often between 1/4″ – 1/2″
- Medium shoots – stub length is about 1x diameter of shoot, often between 1/8″ – 1/4″
- Weak shoots – stub length is about 1/2x diameter of shoot, often between 1/16″ – 1/8″
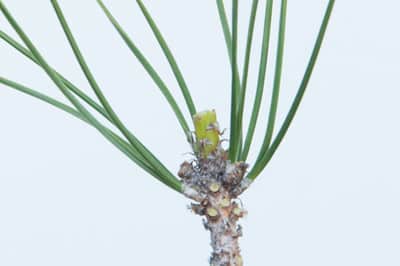
Long stub
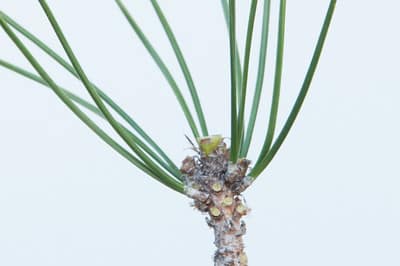
Medium stub
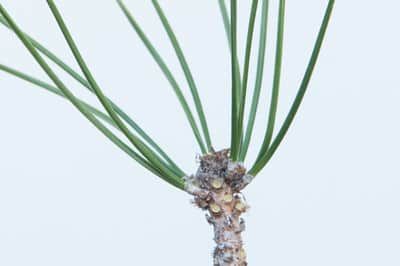
Small stub
Using Timing to Control Vigor
The third approach to the reducing vigor of individual branches is to decandle weak shoots early and more vigorous shoots later. We know that the earlier we decandle a tree, the longer the summer shoots will have to grow. By removing spring growth from the weakest shoots first, we give the summer shoots on these branches a head start over the branches that will be decandled later.
Putting It All Together – Approaches to Decandling
There are many ways to decandle red and black pine bonsai. I don’t believe that some techniques are better or worse than others as I’ve seen many techniques used to great effect by professionals and hobbyists alike. Rather, each technique has its benefits and drawbacks. I tend to use several approaches during any given decandling season depending on the needs of the tree and my available time.
One-Day Approaches
A simple distinction among decandling techniques can be made based on the number of days required to complete the removal of spring shoots in a given season. The most efficient approach is to remove all candles on a given day. The one-day approach is appropriate for most pines that are regularly decandled, and it makes the most sense when time is limited. Traveling professionals, for example, often take this approach when return visits to a customer’s home are impractical.
Removing all of a tree’s spring shoots on a single day gives summer shoots an equal amount of time to develop. Thus, the basic act of removing the spring growth does little to balance the weak and strong areas of the tree. The two most common techniques for balancing vigor when removing all of a tree’s spring shoots on a given day are pulling needles and leaving stubs. In order for these techniques to work properly, one must identify the strong and weak areas of the tree.
In general, upper branches are stronger than lower branches, and exterior branches are stronger than interior branches, but the most obvious indicator of vigor is the size of the spring shoot.
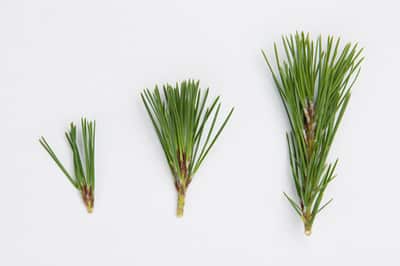
Small, medium, and large shoots
Reducing vigor in stronger areas can help balance the overall vigor of the tree. When taking the needle-plucking approach, this means we leave fewer needles in strong areas and more needles in weak areas.
- Strong areas – leave 3-7 pairs
- Medium areas – leave 5-9 pairs
- Weak areas – leave 7-12 pairs
The weakest areas – shoots with 1-3 pairs of needles – are generally left alone.
The stub approach is similar. We leave longer stubs in strong areas and shorter stubs in weak areas.
- Strong areas – leave long stub
- Medium areas – leave medium stub
- Weak areas – leave very short stub
Don’t feel comfortable evaluating the different areas of vigor on the tree? It’s perfectly fine to keep all stubs short and pluck every branch to a set number of needles from top to bottom. Many pine growers in the U.S. and in Japan prefer this approach and have great results. Try both approaches and see what works best for your trees.
Multi-Day Approaches
When growth on a pine is way out of balance – some shoots are very strong while others are quite weak – I’ll often decandle a tree over a period of several weeks, removing groups of spring shoots every 10-14 days. We begin by removing the weakest shoots to give the summer shoots on these branches the longest time to develop. After dividing a tree into groups of relative vigor, we can decandle as follows:
- Remove all small shoots
- Wait 10 days
- Remove all medium shoots
- Wait 10 days
- Remove all large shoots
In practice, this might look like the following.
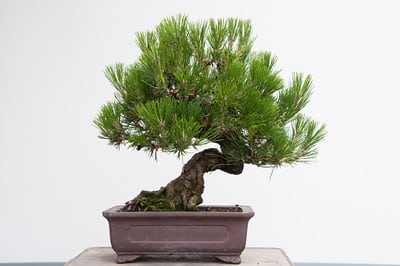
Day zero – before decandling
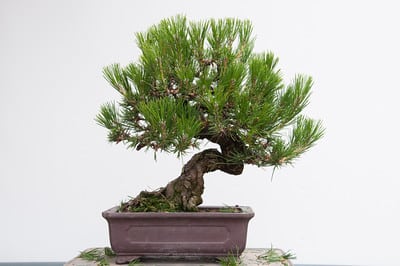
Day zero – after removing small shoots
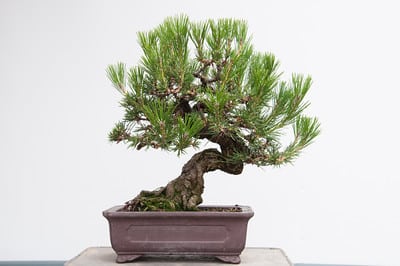
Day 10 – after removing medium shoots
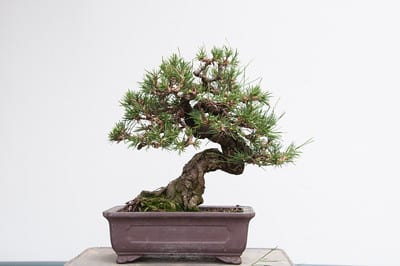
Day 20 – after removing large shoots
Putting it All Together
Decandling can become interesting when we start to combine techniques. For example, after removing all of the spring shoots from the above pine, I pulled needles from the strong areas to further reduce their vigor.
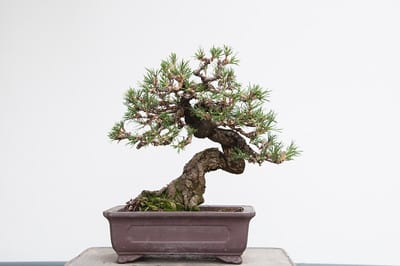
Day 20 – after pulling needles
As an alternative to pulling needles, I could have left stubs in the strong areas. Or I could have combined all three approaches. In short, we can combine any number of approaches to decandling red and black pine bonsai.
Considering the number of options this leaves us with, it can be difficult to know where to begin. Experience is our best guide here. But as hiring a professional to work on our bonsai or taking our trees to a workshop with an experienced teacher isn’t always an option, we may be navigating these options alone. Which is fine. Simply starting with a best guess and learning from the results is a great way to learn how our trees respond to decandling.
Decandling Aftercare
To restate a common theme: decandling is very stressful for pine bonsai. In some cases trees can lose up to 60% or 70% of their foliage during decandling. One-year old needles that have been growing beneath the shade of new shoots are newly exposed to full sun. Scores or even hundreds of small wounds have opened from which a tree may have lost sap. It’s important to take care at this point to keep decandled pine bonsai healthy.
How Do You Care for Trees after Decandling?
Be kind to them. Freshly decandled pines are gathering their strength to send out new growth at this stage – growth that won’t be as strong as it was in spring. Here are the areas in which you can make a difference.
- Watering – removing significant amounts of a tree’s foliage reduces transpiration and the tree’s need for water, however, decandling happens near summer solstice and even decandled trees can dry out quickly this time of year. As always, take care not to over or under water and reach for the hose before the soil completely dries out.
- Sunlight – keep decandled pines in full sun. Last year’s needles may yellow a bit but sunlight is necessary to help stimulate budding.
- Fertilizing – in general, stop fertilizing when you decandle. If you use dry fertilizer, remove it when you remove the spring shoots. If you use liquid fertilizer, stop applying it when you decandle. After four weeks, begin fertilizing again following the same incremental approach used in spring. Exception – if your tree is on the weak side, continue fertilizing throughout summer.
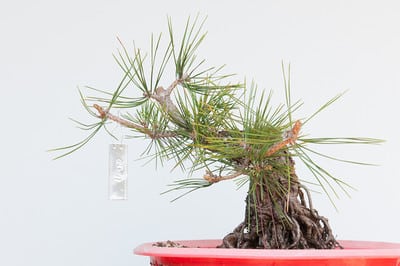
Decandled pine – 9 years old
Anything Else?
Yes! Right after decandling is a good time to wire pine bonsai. Some restraint is required as the biggest cuts and bends are best performed when the tree is less active, typically in fall or early spring. When wiring pines after decandling it can be easy to break needles or injure recently cut areas so proceed with caution. And as new buds can begin to appear after just one week, the window of opportunity to wire is narrow. Wiring pines once summer shoots appear is possible but not advised as new growth breaks easily.
Not sure if this is the right time for you to wire? No problem, there’s no rush – feel free to wire in fall with the rest of us!
Let Summer Buds Grow
In general, we want two new shoots at the end each branch to develop on black and red pine bonsai.
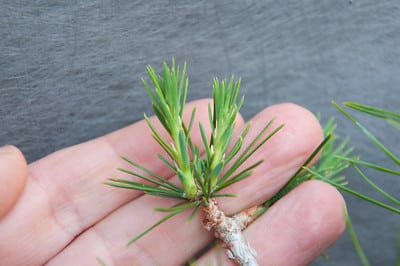
Red pine – two summer shoots
Nature, however, doesn’t always provide us with what we’re looking for.
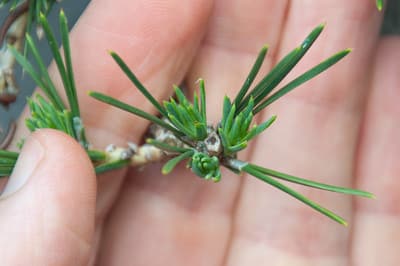
Black pine – three shoots
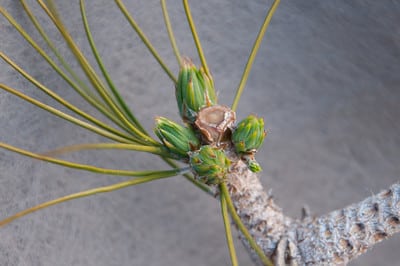
Four summer shoots
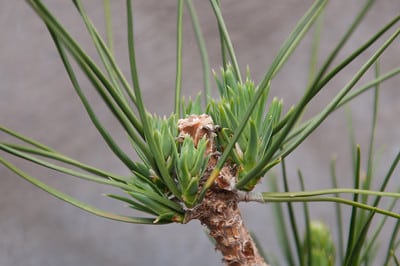
More shoots than I want to count
One shoot can be acceptable – especially when that’s all we get – but three shoots are less so. It’s easy to fill a silhouette with branches that have three, four, five or more shoots each, but this isn’t always desirable. What are the benefits of branches with two shoots each?
- More attractive branch structure
- No unsightly knuckles
- Easy to maintain balanced branch density
- Easy to wire
Are there any exceptions? Definitely. It’s fine, for example, to leave more than two shoots when preparing a tree for exhibit if extra foliage is needed to improve the silhouette. I also occasionally leave three or more branches on trees in development knowing that I’ll thin out extra branches in the future.
What do I do when more than two summer buds appear after decandling? Usually nothing. Some practitioners recommend thinning summer buds to two to save us the work of fall cutback and to avoid swelling that results from large numbers of buds that emerge from the same spot. Removing extra buds in summer, however, does not always produce the desired effect.
The appearance of more than two shoots on a single branch is an indication that the branch is fairly strong. In general, the more summer shoots we find, the stronger the branch. Looking at problem in terms of strength, the problem to be solved is not the number of shoots but how best to deal with excess vigor.
Why not remove the extra shoots? Reducing the number of shoots can channel remaining vigor into a smaller number of branches, thereby producing even more vigorous growth on the remaining shoots. It’s often better to let the extra shoots develop through summer and remove them when they harden off in fall or winter.
What if there are five or more shoots – won’t that create a large knuckle? My main concern in these cases is not scars or the unsightly branch unions that may develop, but overall branch vigor. Unless it’s important to preserve the branch, I’m more likely to remove it entirely as there’s too much energy to be of use in a refined tree.
So Much Information – Where Should I Begin?
So, what if I’m somewhat new to bonsai and I think I have a tree that could benefit from decandling but I don’t know where to begin? Easy – keep it simple. If you’re having trouble finding a starting point and there are no decandling pros in the area, try the following:
- Remove all new shoots on June 15
- Don’t leave stubs
- Leave no more than 10 pairs of needles per branch
That’s it – for now. By taking a simple approach, you can learn how your tree responds to the decandling and you can begin making adjustments the following year. Is the summer growth too weak? Try feeding more, decandling earlier, or waiting until the tree is healthier before decandling again. Is the summer growth too strong? Try decandling later or removing more needles. Is the summer growth unbalanced? Feel free to experiment with the various techniques for controlling vigor.
Unhappy or completely surprised by the results? Take heart – many pines respond unpredictably to the first few decandlings. Red and black pines often settle into a pattern within 3-5 years.
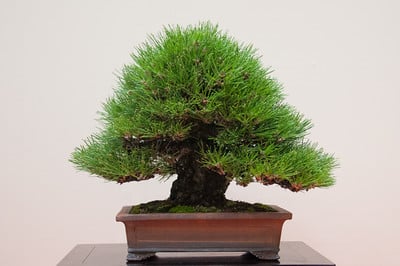
Black pine on display at the 2011 Gomangoku exhibit
Still have questions? Ask away below or check in at the forum and we’ll see what we can do to help.
Subscribe to Bonsai Tonight
New Posts Delivered Every Tuesday and Friday
James Dawsey says
Jonas I have one question. In your 3rd picture you show a 3 yr old pine and suggest not to decandle. I understand that. But my young pines in the ground are 3+ years in the ground on tiles, skinny, and two feet tall with long internodes. Shouldn’t I push them back while they thicken? I don’t want to trunk chop them later. Thanks, Rick
>
Jonas Dupuich says
Great question Rick. You can force more lower growth on a developing tree by decandling at the cost of slowing it down a bit. I haven’t needed to do this with my pines but it would work. Do note that with decandling you only get growth where you cut – if the tree is already 2′ tall that may limit your options. There may be other options depending on how exactly your tree looks – feel free to post pics at http://ask.bonsaitonight.com
anijhuis says
Wow!! Nicely done! Will be sharing this!!!
Michael Cole says
Jonus…
This is the absolute best explanation of the technique to date!
john zerio says
Truly excellent explanation, easy to follow and apply. Great job.
Karen Trucke says
Have you done or will you do something on Mugo Pines please
Jonas Dupuich says
Hi Karen – I haven’t done anything on mugo pine, will look to do so in the future. The very short answer is to treat them like white pine – no decandling.
Randi Heis says
Jonas, this is an excellent primer to Red and Black Pine care. Thank you four your time and effort! Very well done.
Please consider an in depth article on pruning Hinoki foliage whorls. This is a subject with limited clear direction and even less pictorial guides.
Best,
Randi
Jonas Dupuich says
Thanks Randi! Will make a note about a future hinoki article.
Ray says
Excellent article Jonas. Covers a llot of areas where there is confusion.
Thank you
Lee Squires says
Good info Jonas. I think this will help a lot of folks
Mark says
Fantastic information, thank you Jonas. I have a question as well if I may. You mention that if a branch is too vigorous and not important to the overall design of the tree you would just remove the whole branch. Does removing the branch also remove the excessive energy or does that get transferred somewhere else on the tree? Thanks again.
Jonas Dupuich says
Great question Mark. I’d love to measure the net effect of removing a branch. What I’ve learned from experience is that removing a vigorous branch doesn’t typically affect other branches in an obvious way. Whether there is a minor boost to other branches or a net loss of food production capabilities I have yet to determine.
During the early stages of development, I try to ramify the tree as quickly as possible to slow it down. In these cases, I’ll often keep extra branches, vigorous or not, in an effort to distribute the vigor of the summer shoots into as many branches as possible. (See comments on a recent post for a note about this.) Removing a vigorous branch from an otherwise balanced tree – the case the present article refers to – has little noticeable effect.
Thanks for asking about this – I’ll look to spell this out more completely in the future.